When a trusty chainsaw, trimmer, or leaf blower suddenly won’t start, the diaphragm carburetor is often the hidden culprit behind hard starting, stalling, and loss of power. The good news is that diaphragm carburetor repair is absolutely doable at home with basic tools, a bit of patience, and the right step‑by‑step guidance. This DIY carburetor repair steps guide walks through everything from symptoms and diagnosis to a small engine carburetor rebuild so you can get your tools running like new again.
What a diaphragm carburetor does
A diaphragm carburetor is a small fuel‑metering device commonly used on 2‑stroke and many small 4‑stroke engines in chainsaws, string trimmers, and blowers. Instead of a float bowl, it uses flexible diaphragms and check valves to pull fuel from the tank and mix it with air based on engine vacuum and throttle position.
Because these diaphragms are thin rubber‑like parts, they harden, shrink, or warp over time, causing poor fuel delivery and inconsistent engine performance. Dirt, varnished fuel, and clogged internal passages in the carb body compound the problem, making diaphragm carburetor repair a key maintenance task for small engines.
Common symptoms that point to diaphragm carburetor repair
Before starting a small engine carburetor rebuild, check for classic signs that the carb and its diaphragms are failing. Typical symptoms include:
-
Engine will only start with choke on, then dies when you open the choke.
-
Engine starts but stalls at idle or under load, especially when throttled.
-
Surging, erratic RPM, or hesitation when you squeeze the trigger.
-
Need to prime bulb excessively or fuel bulb won’t fill properly.
-
Long‑stored equipment with stale fuel and gummed‑up internals.
If these sound familiar, learning how to repair a diaphragm carburetor is often more effective and cheaper than replacing the entire unit.
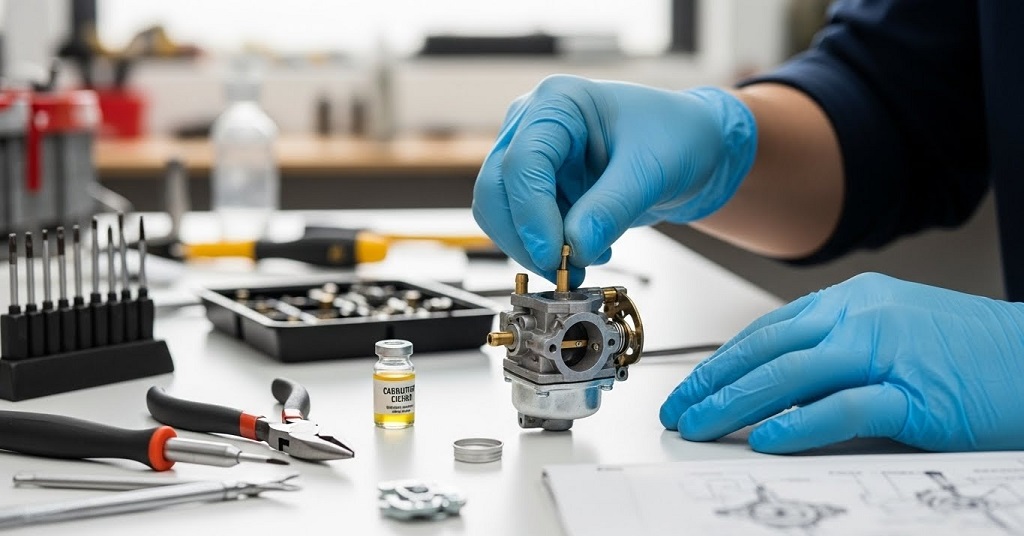
Tools, parts, and safety basics
Before following any DIY carburetor repair steps, gather the right tools and parts and prepare a safe workspace.
Recommended tools:
-
Screwdrivers (Phillips and flathead) or Torx drivers, depending on your carb.
-
Small sockets or nut drivers for carb mounting bolts.
-
Needle‑nose pliers and a small pick or precision screwdriver for tiny springs and pins.
-
Carburetor cleaner spray or an ultrasonic cleaner plus a small container to catch overspray.
-
Compressed air (even a small compressor or canned air) for blowing out passages.
Parts and consumables:
-
Model‑specific diaphragm and gasket kit or complete carburetor rebuild kit.
-
New fuel lines and primer bulb if cracked or brittle.
-
Fresh, correctly mixed fuel for 2‑stroke engines or fresh gasoline for 4‑stroke units.
Safety tips:
-
Work in a well‑ventilated area away from open flames when handling fuel and carb cleaner.
-
Wear safety glasses to protect your eyes from cleaner, debris, and compressed air.
-
Take pictures as you disassemble so reassembly is easier and safer.
Step‑by‑step: remove and open the carburetor
These DIY carburetor repair steps apply broadly to many cube‑style diaphragm carburetors used on chainsaws, trimmers, and blowers, though exact layouts vary.
-
Access the carburetor
-
Remove the spark plug wire for safety before starting any diaphragm carburetor repair.
-
Take off the air filter cover and air filter assembly to expose the carb.
-
Remove any covers or shrouds blocking access, noting bolt locations as you go.
-
Disconnect fuel lines and linkages
-
Identify and mark the fuel inlet, return, and impulse lines so they go back correctly.
-
Gently pull fuel lines off the carb with pliers, being careful not to crack old hoses.
-
Disconnect the throttle linkage and any choke linkage by rotating and slipping them out of the levers or holes.
-
Remove the carburetor
-
Unbolt the carb from the intake manifold or adapter using the appropriate socket or driver.
-
Pay attention to the orientation of gaskets and spacers between the carb and engine.
-
Once free, place the carburetor on a clean bench or tray to avoid losing small parts.
Cleaning the carb body before rebuild
Proper cleaning is critical to successful small engine carburetor rebuild work, especially in tiny internal passages that control idle and mid‑range fuel.
-
Remove external dirt with a brush before opening the carb to keep debris out of the internals.
-
Take off the primer side cover, metering diaphragm cover, and any removable plates by undoing the small screws.
-
Carefully separate the metal plates, diaphragms, and gaskets, noting their order and orientation.
Once disassembled:
-
Spray carb cleaner into all visible passages, jets, and orifices, then let it soak briefly.
-
Do not poke metal wire or drill bits into jets; use soft fishing line if needed to avoid damage.
-
Rinse with more cleaner or ultrasonic solution if available, then blow everything dry with compressed air.
During this step, make sure rubber parts, old diaphragms, and gaskets are removed so they do not swell or degrade from cleaner exposure.
Replacing diaphragms, gaskets, and wear parts
At the heart of diaphragm carburetor repair is replacing the flexible diaphragms and their supporting gaskets. These parts handle fuel pumping and metering, and even small distortion can throw off the mixture.
Key components to inspect or replace:
-
Metering diaphragm and its paper gasket, usually on the side with a square cover and fuel lever.
-
Pump diaphragm and gasket, often on the primer or fuel pump side of the carb.
-
Needle, spring, and lever (metering assembly) if your kit includes them and they show wear or corrosion.
Ordering of parts matters: on many cube‑style carbs, the diaphragm and gasket must be stacked in a specific order for proper operation. For example, some designs place the gasket against the carb body with the diaphragm on top, while others reverse this arrangement, so follow your kit instructions or photos from disassembly.
When installing new diaphragms:
-
Align screw holes and any locating pins so flaps and valves sit where they should.
-
Ensure the metal disc in the metering diaphragm faces the lever correctly, typically metal side toward the lever.
-
Tighten cover screws evenly in a criss‑cross pattern to avoid warping the cover or diaphragm.
Reassembling and reinstalling the carburetor
Once the new parts are in place, the final DIY carburetor repair steps are to reassemble the carburetor and reinstall it on your chainsaw, trimmer, or blower.
-
Double‑check all small parts, including springs, pins, and levers, are seated where they belong.
-
Reattach the carburetor to the intake with the correct gaskets and insulators in the original orientation.
-
Reconnect throttle and choke linkages, verifying smooth movement from idle to full throttle.
-
Reinstall fuel lines to the proper fittings and replace cracked or hardened hoses as needed.
-
Refit the air filter and cover, ensuring the filter is clean and not restricting airflow.
After everything is bolted up:
-
Add fresh fuel, reconnect the spark plug wire, and prime the carb according to the tool’s instructions.
-
Start the engine and let it warm up; some minor adjustment of low‑ and high‑speed mixture screws may be needed for best performance.
Chainsaws vs trimmers vs blowers
The core process of diaphragm carburetor repair is similar across chainsaws, trimmers, and blowers, but there are a few practical differences.
| Tool type | What’s usually different | What stays the same |
|---|---|---|
| Chainsaw | More compact packaging around the carb and air box; bar and chain oil system nearby. | Diaphragm replacement, cleaning passages, and metering assembly steps remain identical. |
| Trimmer | Longer throttle cable or rod linkages, often with simpler shrouds and easier carb access. | Same diaphragm stack order, needle and lever service, and fuel line routing basics apply. |
| Blower | Larger fan housing may need removal to reach the carb, and more attention to dust ingress. | Cleaning, gasket replacement, and metering diaphragm installation follow the same principles. |
No matter the tool, a careful small engine carburetor rebuild using fresh diaphragms typically restores starting, idling, and power if compression and ignition are still healthy.
Pro tips and common mistakes to avoid
Learning how to repair a diaphragm carburetor is much easier when you avoid a few common pitfalls that cause many “it still won’t run” complaints.
-
Do not reverse diaphragm and gasket order; incorrect stacking can block fuel passages.
-
Avoid soaking or heavily spraying new diaphragms with strong carb cleaner to prevent swelling and distortion.
-
Never over‑tighten cover screws, which can warp the carb body or deform the diaphragm and create leaks.
-
Replace hardened or cracked fuel lines and primer bulbs; new diaphragms cannot fix air leaks in the fuel system.
-
Always use fresh, ethanol‑appropriate fuel mix; stale fuel quickly gums up a newly rebuilt carb.
For beginners, taking step‑by‑step photos during disassembly is one of the simplest ways to make reassembly straightforward and avoid lost parts or wrong link routing.
FAQs about diaphragm carburetor repair
Is it better to rebuild or replace a diaphragm carburetor?
For many chainsaws, trimmers, and blowers, a diaphragm and gasket kit is significantly cheaper than a new carburetor and usually restores performance if the carb body is not heavily corroded or damaged. Replacement makes more sense when parts are unavailable, the casting is cracked, or throttle shafts are badly worn.
How long does a small engine carburetor rebuild take?
For most DIY users, a basic diaphragm carburetor repair on a handheld tool takes about 30–90 minutes, depending on access, familiarity, and how dirty the carb is. Extra time may be needed for deep cleaning, replacing fuel lines, or tuning mixture screws.
Do I need to adjust mixture screws after rebuilding?
In many cases, engines will run on existing settings, but slight adjustments to low‑speed and high‑speed screws often improve idle and acceleration after replacing diaphragms. Adjustments should be made in small increments, following manufacturer guidelines and never defeating safety limits or emissions caps.
Can carb cleaner damage diaphragms?
Aggressive carburetor cleaners can swell or harden rubber and synthetic diaphragms if they are sprayed directly or soaked for long periods. Best practice is to remove diaphragms and gaskets before cleaning and install new ones after the body is fully dry.
Why does my engine still run poorly after a rebuild?
Persistent problems after diaphragm carburetor repair can come from clogged fuel filters, air leaks in crank seals or intake gaskets, low compression, worn spark plugs, or misadjusted mixture screws. Double‑check fuel system integrity, ignition components, and gasket orientation before assuming the carburetor is still at fault.
Time to fix your small engine
With the right parts, tools, and clear DIY carburetor repair steps, you can confidently tackle diaphragm carburetor repair on your chainsaw, trimmer, or blower and bring dead equipment back to life instead of replacing it. Start by identifying your carb model, ordering a quality diaphragm kit, and setting aside time to clean, rebuild, and properly reassemble your small engine carburetor for safe, reliable power. If this guide helped, use it as a checklist during your next small engine carburetor rebuild and share it with friends or coworkers struggling with hard‑starting tools so more people can save money and keep equipment running longer.
Related Topics: Creative Cloud Font Licensing vs Commercial Fonts: A Complete Guide
Related Topics: How to Create Lookalike Audience in Google Ads